13. PC2台とルータ2台の構成でネットワークを構築してみる
ネットワーク構成
1台のwindows10と、もう1台のRaspberryPiの間にルーターを2台設置して、3つのネットワークを構成。お互いのpcからpingが飛べばゴール。
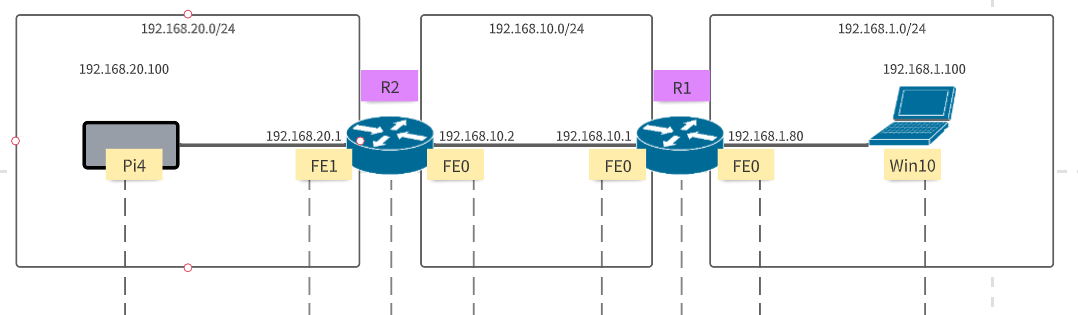
R1 ルーターの設定
インターフェイスにIPアドレスをふる。
!FastEthernet0にIPアドレスをふる

#conf t
(config)#int fa0
(config-if)#ip address 192.168.1.80 255.255.255.0
(config-if)#no shutdown

(config-if)#exit
(config)#

!FastEthernet1にIPアドレスをふる

(config)#int fa1
(config-if)#ip address 192.168.10.1 255.255.255.0
(config-if)#no shutdown

(config-if)#exit
(config)#exit
#

!確認。以下のキャプチャーだとFE0とFE1のProtocolがupになっているが実際はまだPCをつないでないので、downでいい。

#sh ip int brief
Interface                  IP-Address      OK? Method Status                Protocol
BRI0                       unassigned      YES NVRAM  administratively down down
BRI0:1                     unassigned      YES unset  administratively down down
BRI0:2                     unassigned      YES unset  administratively down down
FastEthernet0              192.168.1.80    YES NVRAM  up                    up
FastEthernet1              192.168.10.1    YES manual up                    up
FastEthernet2              unassigned      YES unset  up                    down
FastEthernet3              unassigned      YES unset  up                    down
FastEthernet4              unassigned      YES unset  up                    down
FastEthernet5              unassigned      YES unset  up                    down
FastEthernet6              unassigned      YES unset  up                    down
FastEthernet7              unassigned      YES unset  up                    down
FastEthernet8              unassigned      YES unset  up                    down
FastEthernet9              unassigned      YES unset  up                    down
Vlan1                      unassigned      YES NVRAM  up                    down
スタティックルートの設定をおこなう。
#conf t
(config)#ip route 192.168.20.0 255.255.255.0 192.168.10.2

(config)#exit
#sh ip route

Codes: C - connected, S - static, R - RIP, M - mobile, B - BGP
       D - EIGRP, EX - EIGRP external, O - OSPF, IA - OSPF inter area
       N1 - OSPF NSSA external type 1, N2 - OSPF NSSA external type 2
       E1 - OSPF external type 1, E2 - OSPF external type 2
       i - IS-IS, su - IS-IS summary, L1 - IS-IS level-1, L2 - IS-IS level-2
       ia - IS-IS inter area, * - candidate default, U - per-user static route
       o - ODR, P - periodic downloaded static route

Gateway of last resort is not set

C    192.168.10.0/24 is directly connected, FastEthernet1
S    192.168.20.0/24 [1/0] via 192.168.10.2
C    192.168.1.0/24 is directly connected, FastEthernet0
上記のように、触接接続の「C」以外に、手動で設定したスタティックルート「S」が表示されていればOK。
R2 ルーターの設定
インターフェイスにIPアドレスをふる。
!FastEthernet0にIPアドレスをふる

#conf t
(config)#int fa0
(config-if)#ip address 192.168.10.2 255.255.255.0
(config-if)#no shutdown

(config-if)#exit
(config)#

!FastEthernet1にIPアドレスをふる

(config)#int fa1
(config-if)#ip address 192.168.20.1 255.255.255.0
(config-if)#no shutdown

(config-if)#exit
(config)#exit
#

!確認。以下のキャプチャーだとFE0とFE1のProtocolがupになっているが実際はまだPCをつないでないので、downでいい。

#sh ip int brief
Interface                  IP-Address      OK? Method Status                Protocol
BRI0                       unassigned      YES NVRAM  administratively down down
BRI0:1                     unassigned      YES unset  administratively down down
BRI0:2                     unassigned      YES unset  administratively down down
FastEthernet0              192.168.10.2    YES NVRAM  up                    up
FastEthernet1              192.168.20.1    YES manual up                    up
FastEthernet2              unassigned      YES unset  up                    down
FastEthernet3              unassigned      YES unset  up                    down
FastEthernet4              unassigned      YES unset  up                    down
FastEthernet5              unassigned      YES unset  up                    down
FastEthernet6              unassigned      YES unset  up                    down
FastEthernet7              unassigned      YES unset  up                    down
FastEthernet8              unassigned      YES unset  up                    down
FastEthernet9              unassigned      YES unset  up                    down
Vlan1                      unassigned      YES NVRAM  up                    down
スタティックルートの設定をおこなう。
#conf t
(config)#ip route 192.168.1.0 255.255.255.0 192.168.10.1

(config)#exit
#sh ip route

Codes: C - connected, S - static, R - RIP, M - mobile, B - BGP
       D - EIGRP, EX - EIGRP external, O - OSPF, IA - OSPF inter area
       N1 - OSPF NSSA external type 1, N2 - OSPF NSSA external type 2
       E1 - OSPF external type 1, E2 - OSPF external type 2
       i - IS-IS, su - IS-IS summary, L1 - IS-IS level-1, L2 - IS-IS level-2
       ia - IS-IS inter area, * - candidate default, U - per-user static route
       o - ODR, P - periodic downloaded static route

Gateway of last resort is not set

C    192.168.10.0/24 is directly connected, FastEthernet0
C    192.168.20.0/24 is directly connected, FastEthernet1
S    192.168.1.0/24 [1/0] via 192.168.10.1
上記のように、触接接続の「C」以外に、手動で設定したスタティックルート「S」が表示されていればOK。
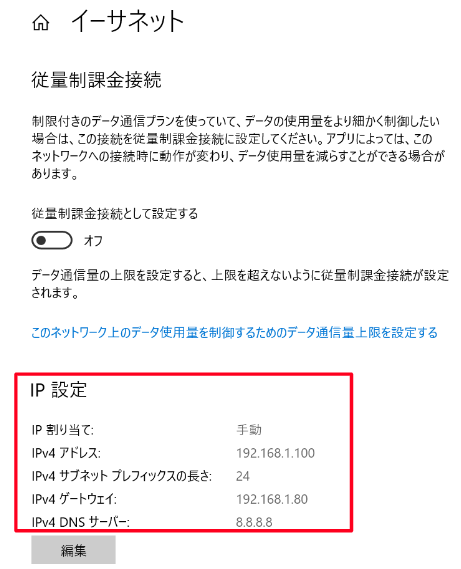
win10の設定
ネットワークの設定から手動で以下のようにIPアドレスを振る。
Pi4の設定
注)以下の記事の説明だとPi4自体のIPアドレスと、デフォルトゲートウェイのIPアドレスが違うので、以下の様に読み替えて下さい。
Pi4のIP:192.168.20.100
デフォルトゲートウェイのIP:192.168.20.1
これで、それぞれの端末からpingが通れば完了です。