
Raspberry Pi4 + openvpn
現在調査中のissue
vpnの中からブラウザでホームページを見ようとすると、httpsが赤くなったり信頼されていないと言われることがある。iptablesのnatが原因か調査中。その他は問題なし。
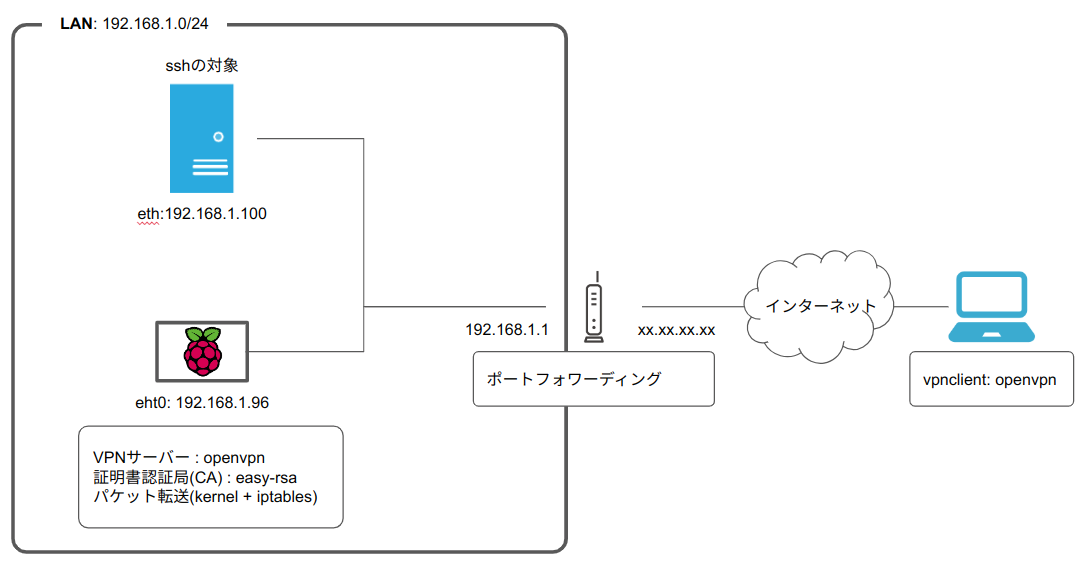
ネットワーク構成図
物理構成は以下のような感じ。
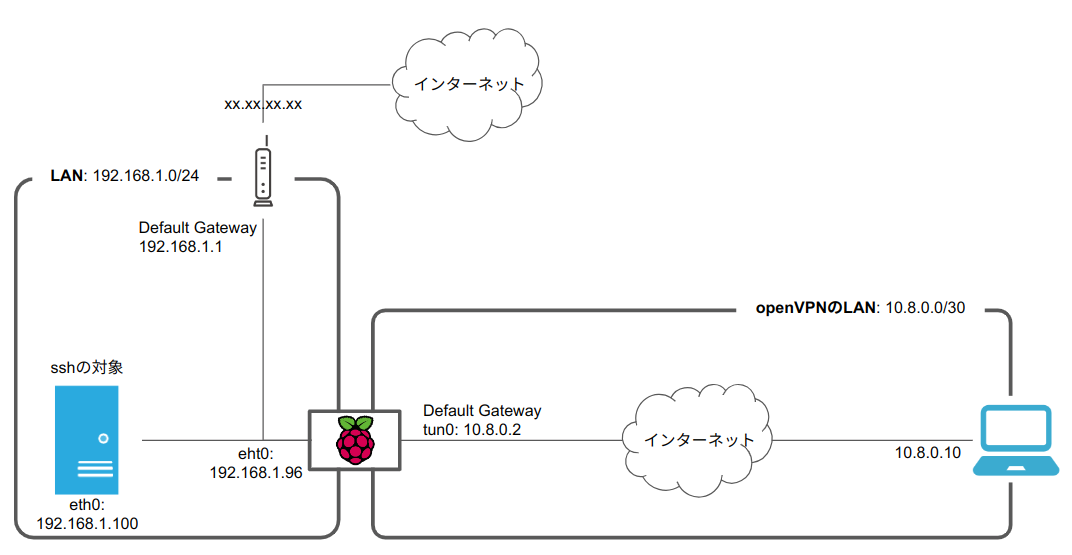
上記の物理構成を変えずにopenvpnを使用して、以下のような論理ネットワーク(仮想LAN)を追加で構成してvpnclientのノートPCをLANネットワークにアクセス可能にします。
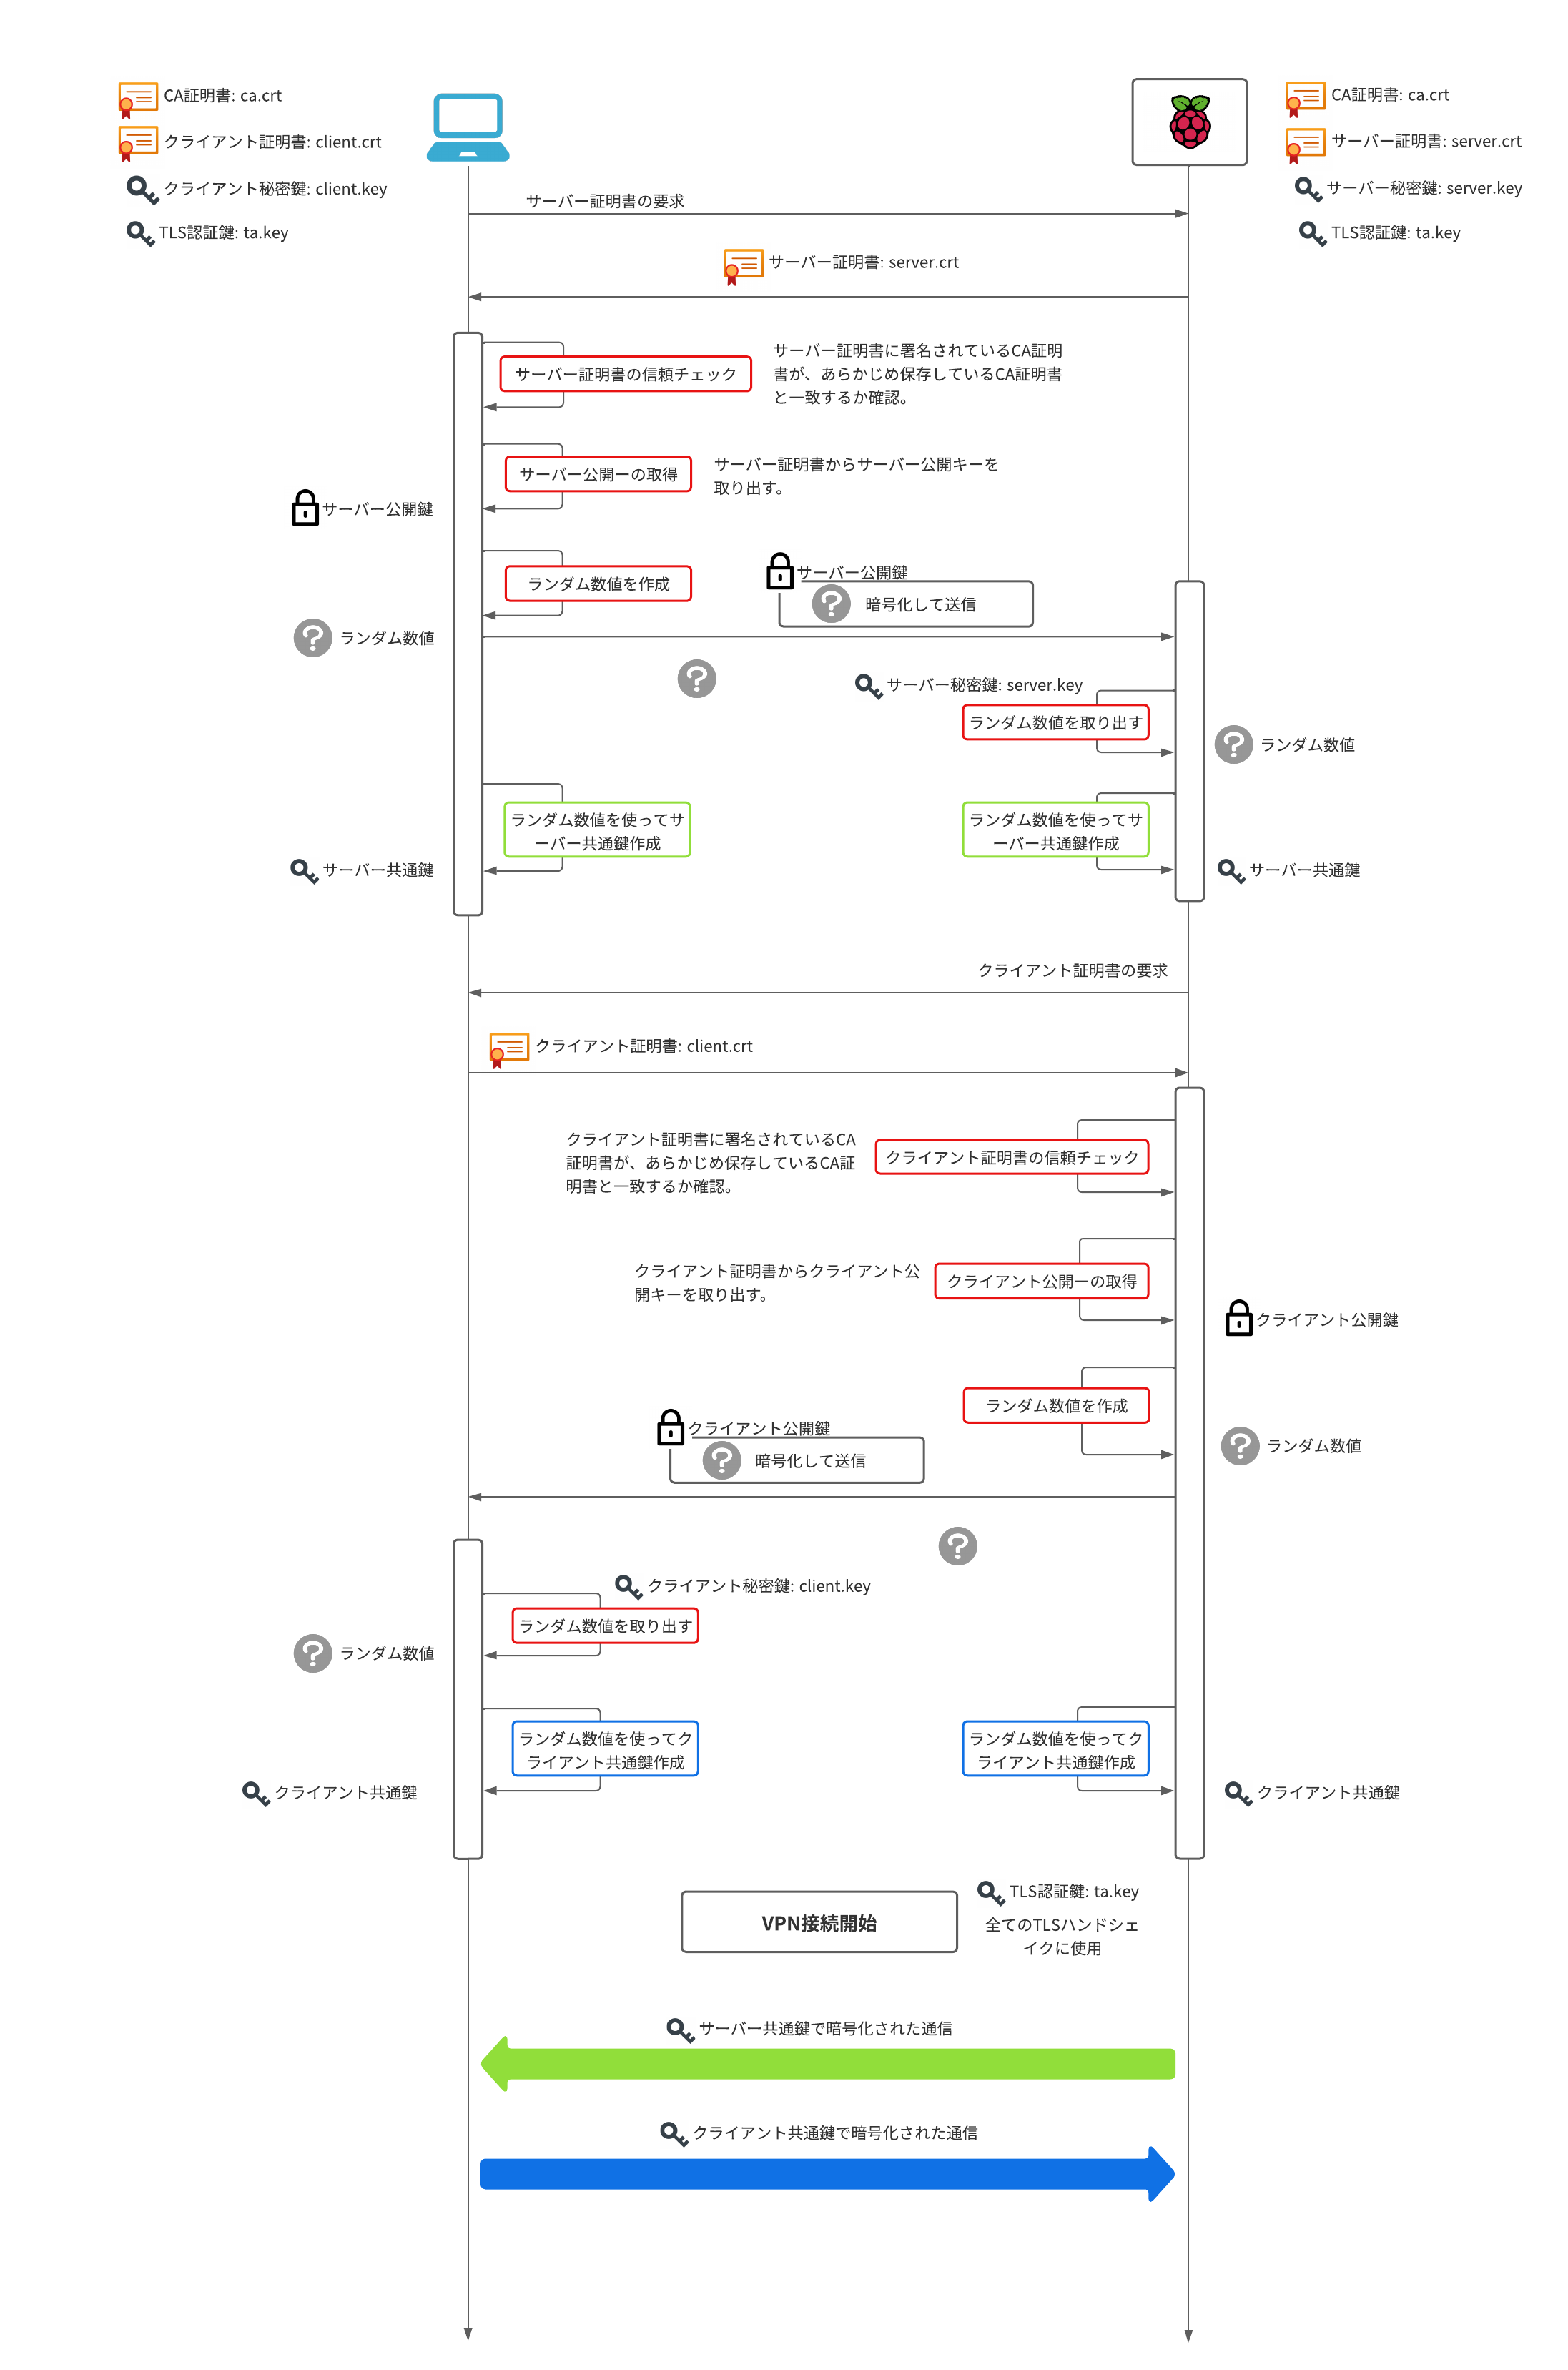
今回使用するVPNの接続方法は、opneVPNを使用します。他には、L2TPというものもあります。openVPNはサーバーとクライアントお互いに証明書を使用した認証が可能となります。証明書が必要となるので証明書の認証局(CA)も必要となり、今回CAはopnevpnが開発している、「easy-rsa」を使用します。
| 項目 | OpenVPN | L2TP |
|---|---|---|
| サマリー | セキュアなリモートアクセスを提供するVPNプロトコル | レイヤー2トンネリングプロトコル |
| 利用シーン | インターネット経由での安全なリモートアクセス | ファイル共有、リモートアクセス、VPNアクセス |
| 認証方法 | ユーザー名とパスワード、証明書、共有鍵 | ユーザー名とパスワード、プリシェアードキー |
| セキュリティ強度 | 高い | 標準 |
| OSI 7階層のレイヤー | レイヤー3(ネットワーク層) | レイヤー2(データリンク層) |
| よく一緒に利用されるプロトコル | TLS (Transport Layer Security) | IPsec (Internet Protocol Security) |
配備するファイル
VPNサーバーとクライアントとで以下のファイルを配備して、VPN接続の認証を証明書ベースでおこなう。
サーバー側のファイル
| 名前 | ファイル名 | 説明 |
|---|---|---|
| CA証明書 | ca.crt | 接続してきたクライアントの証明書の正当性を証明してくれる認証機関として使用する。サーバーとクライアントで同じものを使用する。 |
| サーバー証明書 | server.crt | クライアントがサーバーを確認するために使用します。中にはサーバー公開鍵も含まれます。 |
| サーバー秘密鍵 | server.key | サーバーサイドのみで使用する秘密鍵です。クライアントがサーバー公開鍵で暗号したデータの複合に使用します。 |
| TSL認証共通鍵 | ta.key | クライアントとサーバーで共通の鍵を持ちます。TLSハンドシェイクにHMAC署名を追加してセキュリティを強化します。 |
| DH認証秘密鍵 | dh.pem | サーバー共通鍵とクライアント共通鍵のやり取りをする際に、Diffie-Hellman方式を使用します。 |
| サーバー設定ファイル | server.conf | openvpnサーバーの設定ファイルです。 |
クライアント側のファイル
| 名前 | ファイル名 | 説明 |
|---|---|---|
| CA証明書 | ca.crt | 接続するターバーの証明書の正当性を証明してくれる認証機関として使用する。サーバーとクライアントで同じものを使用する。 実際はファイルではなく、client.ovpnファイルの中に記述。 |
| クライアント証明書 | client.crt | サーバーがクライアントを確認するために使用します。中にはクライアント公開鍵も含まれます。 実際はファイルではなく、client.ovpnファイルの中に記述。 |
| クライアント秘密鍵 | client.key | クライアントサイドのみで使用する秘密鍵です。サーバーがクライアント公開鍵で暗号したデータの複合に使用します。 実際はファイルではなく、client.ovpnファイルの中に記述。 |
| TSL認証共通鍵 | ta.key | クライアントとサーバーで共通の鍵を持ちます。TLSハンドシェイクにHMAC署名を追加してセキュリティを強化します。 実際はファイルではなく、client.ovpnファイルの中に記述。 |
| クライアント設定ファイル | client.ovpn | クライアントのopenvpnの接続設定ファイル。 |
各種ファイルと通信手順
easy-rsaの導入
openvpnが開発する「easy-rsa」というPKI基盤を使用して、各種証明書の発行と管理を行ないます。easy-rsaで発行した、クライアントとサーバーで使用する各種の証明書ファイル等を、最終的にはopenvpnサーバーで使用できるように、openvpnの適切なフォルダに格納します。
easy-rsaのインストール
$ sudo apt install easy-rsa

# 何が入ったか探してみる
$ find / -name 'easy-*' 2>/dev/null
/var/lib/dpkg/info/easy-rsa.list
/var/lib/dpkg/info/easy-rsa.md5sums
/etc/openvpn.back/easy-rsa
/etc/openvpn/easy-rsa
/usr/share/doc/easy-rsa
/usr/share/easy-rsa

# /usr/share/easy-rsaの中身を見てみる
$ sudo tree /usr/share/easy-rsa
/usr/share/easy-rsa
├── easyrsa
├── openssl-easyrsa.cnf
├── vars.example
└── x509-types
    ├── ca
    ├── client
    ├── code-signing
    ├── COMMON
    ├── email
    ├── kdc
    ├── server
    └── serverClient

# make-cadirも一緒にインストールされている
$ which make-cadir
/usr/bin/make-cadir
easy-rsaのインストール時に、「make-cadir」も同時にインストールされます。これはopenvpn側で証明書等を管理する際の必要なファイルを管理&生成するために使用するディレクトリを作成してくれる便利ツールです。後ほど使用します。
証明書管理(easy-rsa)用のユーザーの作成
証明書の管理用にユーザーを作成します。以降の作業は全てこのユーザーでおこないます。rootでの直接の作業はさけましょう。
$ sudo adduser ca-admin
/etc/sudoers.dの下のファイルを編集して、「ca-admin」を追加しておく。
OpenVPN Server
openvpnのインストール
$ sudo apt install openvpn

# 初期の状態を見てみる
$ sudo tree /etc/openvpn/
/etc/openvpn/
├── client
├── server
└── update-resolv-con
今後は以下のディレクトリで作業を進めるので移動します。
$ cd /etc/openvpneasy-rsaのイントール時にインストールされた「make-cadir」を使用して、openvpnの中に証明書関連のディレクトリやファイルを作成します。
ca-admin$ cd /etc/openvpn

ca-admin$ sudo make-cadir easy-rsa

### ca-adminが作業できるように、作成された「easy-rsa」ディレクトリのオーナーを変更。
ca-admin $ sudo su -
root# chown ca-admin.ca-admin easy-rsa
root# exit

### 何が出来たか確認
ca-admin$ sudo tree .
.
├── client
├── easy-rsa
│   ├── easyrsa -> /usr/share/easy-rsa/easyrsa
│   ├── openssl-easyrsa.cnf
│   ├── vars
│   └── x509-types -> /usr/share/easy-rsa/x509-types
├── server
└── update-resolv-conf
証明書作成に使用される環境変数を定義する
上記で作成された「vars」ファイルを編集します。最初は何かたくさん書いてある。
# Easy-RSA 3 parameter settings

# NOTE: If you installed Easy-RSA from your distro's package manager, don't edit
# this file in place -- instead, you should copy the entire easy-rsa directory
# to another location so future upgrades don't wipe out your changes.

# HOW TO USE THIS FILE
#
# vars.example contains built-in examples to Easy-RSA settings. You MUST name
# this file 'vars' if you want it to be used as a configuration file. If you do
# not, it WILL NOT be automatically read when you call easyrsa commands.
#
# It is not necessary to use this config file unless you wish to change
# operational defaults. These defaults should be fine for many uses without the
# need to copy and edit the 'vars' file.
#
# All of the editable settings are shown commented and start with the command
# 'set_var' -- this means any set_var command that is uncommented has been
# modified by the user. If you're happy with a default, there is no need to
# define the value to its default.

# NOTES FOR WINDOWS USERS
#
# Paths for Windows  *MUST* use forward slashes, or optionally double-escaped
# backslashes (single forward slashes are recommended.) This means your path to
# the openssl binary might look like this:
# "C:/Program Files/OpenSSL-Win32/bin/openssl.exe"

# A little housekeeping: DON'T EDIT THIS SECTION
#
# Easy-RSA 3.x doesn't source into the environment directly.
# Complain if a user tries to do this:
if [ -z "$EASYRSA_CALLER" ]; then
	echo "You appear to be sourcing an Easy-RSA 'vars' file." >&2
	echo "This is no longer necessary and is disallowed. See the section called" >&2
	echo "'How to use this file' near the top comments for more details." >&2
	return 1
fi
## (以下、省略)##
全部消して、以下の2行だけに編集する。この設定は証明書を作成する際の暗号アルゴリズムとハッシュ関数を指定するものです。
set_var EASYRSA_ALGO "ec": 証明書の鍵ペア生成に使用する暗号アルゴリズムを指定します。この設定では、楕円曲線暗号(elliptic curve cryptography, ECC)を使用しています。ECCは従来のRSA暗号よりも効率的であり、同じセキュリティレベルを実現するために短い鍵長が必要です。
set_var EASYRSA_DIGEST "sha512": 証明書のハッシュ関数を指定します。この設定では、SHA-512ハッシュ関数を使用しています。SHA-512は安全性が高く、より強力なハッシュ値を生成します。
ca-admin$ cat easy-rsa/vars

set_var EASYRSA_ALGO "ec"
set_var EASYRSA_DIGEST "sha512"
openvpnで使用する認証局を作成する
ココからの作業は、./easy-rsaに移動します。
ca-admin$ cd easy-rsaどんなファイルがあるかを確認。
ca-admin$ tree .
.
├── easyrsa -> /usr/share/easy-rsa/easyrsa
├── openssl-easyrsa.cnf
├── vars
└── x509-types -> /usr/share/easy-rsa/x509-types
PKI(Public Key Infrastractur、公開キー基盤)のフォルダを作成する。以下のコマンドで認証局を初期化します。認証局の設置時に1度だけ行ないます。
easyrsaというコマンドがコピーされているので、コレを使います。
ca-admin$ sudo ./easyrsa init-pki

init-pki complete; you may now create a CA or requests.
Your newly created PKI dir is: /etc/openvpn/easy-rsa/pki
どうなったか確認してみる。pkiというディレクトリが作成されている。
ca-admin$ sudo tree .
.
├── easyrsa -> /usr/share/easy-rsa/easyrsa
├── openssl-easyrsa.cnf
├── pki
│   ├── openssl-easyrsa.cnf
│   ├── private
│   ├── reqs
│   └── safessl-easyrsa.cnf
├── vars
└── x509-types -> /usr/share/easy-rsa/x509-typeses
認証局を作成する。「名前なんにする?」って1度だけ聞かれるけど、デフォルトのままでエンター。
ca-admin$ sudo ./easyrsa build-ca nopass
Using SSL: openssl OpenSSL 1.1.1n  15 Mar 2022
Generating RSA private key, 2048 bit long modulus (2 primes)
...................................................................................+++++
...............................+++++
e is 65537 (0x010001)
You are about to be asked to enter information that will be incorporated
into your certificate request.
What you are about to enter is what is called a Distinguished Name or a DN.
There are quite a few fields but you can leave some blank
For some fields there will be a default value,
If you enter '.', the field will be left blank.
-----
Common Name (eg: your user, host, or server name) [Easy-RSA CA]:

CA creation complete and you may now import and sign cert requests.
Your new CA certificate file for publishing is at:
/etc/openvpn/easy-rsa/pki/ca.crt
何ができたか見てみる。
ca-admin$ sudo tree .
.
├── easyrsa -> /usr/share/easy-rsa/easyrsa
├── openssl-easyrsa.cnf
├── pki
│   ├── ca.crt
│   ├── certs_by_serial
│   ├── index.txt
│   ├── index.txt.attr
│   ├── issued
│   ├── openssl-easyrsa.cnf
│   ├── private
│   │   └── ca.key
│   ├── renewed
│   │   ├── certs_by_serial
│   │   ├── private_by_serial
│   │   └── reqs_by_serial
│   ├── reqs
│   ├── revoked
│   │   ├── certs_by_serial
│   │   ├── private_by_serial
│   │   └── reqs_by_serial
│   ├── safessl-easyrsa.cnf
│   └── serial
├── vars
└── x509-types -> /usr/share/easy-rsa/x509-types
ここでは、以下が作成されていればOKです。
- pki/ca.crt(CA証明書)
- pki/private/ca.key(CA秘密鍵)
サーバー秘密鍵と証明書署名要求を作成する
※「server」の部分は任意。秘密鍵と証明書署名要求ファイルの名前に使われる。
「証明対象のサーバーの名前はなんにする?」って聞いてくるが、コマンドのオプションでしていしたデフォルト(server)のままでエンター。
ca-admin$ sudo ./easyrsa gen-req server nopass
Using SSL: openssl OpenSSL 1.1.1n  15 Mar 2022
Generating a RSA private key
...........................................+++++
..............................................+++++
writing new private key to '/etc/openvpn/easy-rsa/pki/easy-rsa-1693.iCGDZm/tmp.pa6uG0'
-----
You are about to be asked to enter information that will be incorporated
into your certificate request.
What you are about to enter is what is called a Distinguished Name or a DN.
There are quite a few fields but you can leave some blank
For some fields there will be a default value,
If you enter '.', the field will be left blank.
-----
Common Name (eg: your user, host, or server name) [server]:

Keypair and certificate request completed. Your files are:
req: /etc/openvpn/easy-rsa/pki/reqs/server.req
key: /etc/openvpn/easy-rsa/pki/private/server.key
なにができたか見てみる。
ca-admin$ sudo tree .
.
├── easyrsa -> /usr/share/easy-rsa/easyrsa
├── openssl-easyrsa.cnf
├── pki
│   ├── ca.crt
│   ├── certs_by_serial
│   ├── index.txt
│   ├── index.txt.attr
│   ├── issued
│   ├── openssl-easyrsa.cnf
│   ├── private
│   │   ├── ca.key
│   │   └── server.key
│   ├── renewed
│   │   ├── certs_by_serial
│   │   ├── private_by_serial
│   │   └── reqs_by_serial
│   ├── reqs
│   │   └── server.req
│   ├── revoked
│   │   ├── certs_by_serial
│   │   ├── private_by_serial
│   │   └── reqs_by_serial
│   ├── safessl-easyrsa.cnf
│   └── serial
├── vars
└── x509-types -> /usr/share/easy-rsa/x509-types
ここでは以下のファイルが作成されていればOKです。
- pki/private/server.key(サーバー秘密鍵)
- pki/reqs/server.req
サーバ証明書の作成
サーバ証明書に署名する際は、引数を先ほど作成した証明書署名要求「server.req」を指定する(拡張子は不要)。要求を受け入れるかの確認をしてくるので、「yes」とタイプ。
ca-admin$ sudo ./easyrsa sign-req server server
Using SSL: openssl OpenSSL 1.1.1n  15 Mar 2022


You are about to sign the following certificate.
Please check over the details shown below for accuracy. Note that this request
has not been cryptographically verified. Please be sure it came from a trusted
source or that you have verified the request checksum with the sender.

Request subject, to be signed as a server certificate for 825 days:

subject=
    commonName                = server


Type the word 'yes' to continue, or any other input to abort.
  Confirm request details: yes
...............................+++++
Using configuration from /etc/openvpn/easy-rsa/pki/easy-rsa-1737.yuvuQ4/tmp.epovku
Check that the request matches the signature
Signature ok
The Subject's Distinguished Name is as follows
commonName            :ASN.1 12:'server'
Certificate is to be certified until Oct 17 09:29:28 2025 GMT (825 days)

Write out database with 1 new entries
Data Base Updated

Certificate created at: /etc/openvpn/easy-rsa/pki/issued/server.crt
なにができたか確認
# tree .
.
├── easyrsa -> /usr/share/easy-rsa/easyrsa
├── openssl-easyrsa.cnf
├── pki
│   ├── ca.crt
│   ├── certs_by_serial
│   │   └── 9403D6EBE1885C65C36D2DFD8753769E.pem
│   ├── index.txt
│   ├── index.txt.attr
│   ├── index.txt.attr.old
│   ├── index.txt.old
│   ├── issued
│   │   └── server.crt
│   ├── openssl-easyrsa.cnf
│   ├── private
│   │   ├── ca.key
│   │   └── server.key
│   ├── renewed
│   │   ├── certs_by_serial
│   │   ├── private_by_serial
│   │   └── reqs_by_serial
│   ├── reqs
│   │   └── server.req
│   ├── revoked
│   │   ├── certs_by_serial
│   │   ├── private_by_serial
│   │   └── reqs_by_serial
│   ├── safessl-easyrsa.cnf
│   ├── serial
│   └── serial.old
├── vars
└── x509-types -> /usr/share/easy-rsa/x509-types
ここでは以下のファイルが作成されていればOKです。
- pki/issued/server.crt(サーバー証明書)
DHパラメータの生成
Diffie-Hellman 鍵交換は、暗号鍵を安全に転送するために使用される方法です。
コマンド実行すると結構まちます。。。
# ./easyrsa gen-dh
以下のファイルが作成されます。
- pki/dh.pemファイルが作成される。
TLS-Authキーの生成
openvpnでは、セキュリティを向上させるために TLS-Authキー(ta.key)を実装しています。全てのTLSハンドシェイクにHMAC署名を追加するように、クライアントとサーバーで使用する共通鍵を作成します。
# openvpn --genkey secret ta.key
以下のファイルが作成されます。
- ta.key
OpenVPNサーバの構築に必要なファイルを移動する
必要なファイルは以下のものになる。
- ca.crt
- server.crt
- server.key
- dh2048.pem
- ta.key
上記のファイルを「/etc/openvpn/server/」ディレクトリの配下にコピーします。
ca-admin$ sudo cp pki/ca.crt ../server/
ca-admin$ sudo cp pki/issued/server.crt ../server/
ca-admin$ sudo cp pki/private/server.key ../server/
ca-admin$ sudo cp pki/dh.pem ../server/
ca-admin$ sudo cp ta.key ../server/
ca-admin$ ls ../server/
ca.crt	dh.pem	server.crt  server.key	ta.key
OpenVPNサーバの構成ファイルをコピーする
デフォルトのままだと、openvpnサーバの構成ファイルは「/etc/openvpn」フォルダには存在しないため、openvpnパッケージに付属している構成ファイルのテンプレートをコピーしてくる必要があります。
ca-admin$ sudo cp /usr/share/doc/openvpn/examples/sample-config-files/server.conf ../server/
ca-admin$ ls ../server/
ca.crt	dh.pem	server.conf  server.crt  server.key  ta.key
OpenVPNサーバの構成ファイルを編集します。以下の行を編集・追記します。
78 ca ca.crt #そのまま
79 cert server.crt #そのまま
80 key server.key #そのまま
85 dh dh.pem #dh_2048.pemをdh.pemに変更
142 push "route 192.168.1.0 255.255.255.0" #コメントアウト。自分のLANのアドレスに変更。
244 tls-auth ta.key 0 #そのまま
OpenVPN Client
クライアント秘密鍵と証明書署名要求を作成する
接続してくるクライアントを識別できるように、名前を聞かれる。今回は「test」といれた。
ca-admin$ sudo ./easyrsa gen-req client nopass
Using SSL: openssl OpenSSL 1.1.1n  15 Mar 2022
Generating a RSA private key
...+++++
.......................................................+++++
writing new private key to '/etc/openvpn/easy-rsa/pki/easy-rsa-2156.tty8u8/tmp.96r0wc'
-----
You are about to be asked to enter information that will be incorporated
into your certificate request.
What you are about to enter is what is called a Distinguished Name or a DN.
There are quite a few fields but you can leave some blank
For some fields there will be a default value,
If you enter '.', the field will be left blank.
-----
Common Name (eg: your user, host, or server name) [client]:test

Keypair and certificate request completed. Your files are:
req: /etc/openvpn/easy-rsa/pki/reqs/client.req
key: /etc/openvpn/easy-rsa/pki/private/client.key
なにができたか?
ca-admin$ sudo tree .
.
├── easyrsa -> /usr/share/easy-rsa/easyrsa
├── openssl-easyrsa.cnf
├── pki
│   ├── ca.crt
│   ├── certs_by_serial
│   │   └── 9403D6EBE1885C65C36D2DFD8753769E.pem
│   ├── dh.pem
│   ├── index.txt
│   ├── index.txt.attr
│   ├── index.txt.attr.old
│   ├── index.txt.old
│   ├── issued
│   │   └── server.crt
│   ├── openssl-easyrsa.cnf
│   ├── private
│   │   ├── ca.key
│   │   ├── client.key
│   │   └── server.key
│   ├── renewed
│   │   ├── certs_by_serial
│   │   ├── private_by_serial
│   │   └── reqs_by_serial
│   ├── reqs
│   │   ├── client.req
│   │   └── server.req
│   ├── revoked
│   │   ├── certs_by_serial
│   │   ├── private_by_serial
│   │   └── reqs_by_serial
│   ├── safessl-easyrsa.cnf
│   ├── serial
│   └── serial.old
├── ta.key
├── vars
└── x509-types -> /usr/share/easy-rsa/x509-types
ここでは以下のファイルが作成されていればOKです。
- pki/private/client.key(クライアント秘密鍵)
- pki/reqs/client.req
クライアント証明書を作成する
クライアント証明書に署名する際は、引数を先ほど作成した証明書署名要求「client_test.req」を指定する。(拡張子は不要)。要求を受け入れるか確認してくるので、「yes」と入力。
ca-admin$ sudo ./easyrsa sign-req client client
Using SSL: openssl OpenSSL 1.1.1n  15 Mar 2022


You are about to sign the following certificate.
Please check over the details shown below for accuracy. Note that this request
has not been cryptographically verified. Please be sure it came from a trusted
source or that you have verified the request checksum with the sender.

Request subject, to be signed as a client certificate for 825 days:

subject=
    commonName                = test


Type the word 'yes' to continue, or any other input to abort.
  Confirm request details: yes
Using configuration from /etc/openvpn/easy-rsa/pki/easy-rsa-2209.1K7Pp7/tmp.MNAwKK
Check that the request matches the signature
Signature ok
The Subject's Distinguished Name is as follows
commonName            :ASN.1 12:'test'
Certificate is to be certified until Oct 17 09:52:56 2025 GMT (825 days)

Write out database with 1 new entries
Data Base Updated

Certificate created at: /etc/openvpn/easy-rsa/pki/issued/client.crt
ここでは以下のファイルが作成されます。
- pik/issued/client_test.crt(クライアント証明書)
OpenVPNクライアントの構成ファイルをコピーする
デフォルトのままだと、openvpnクライアントの構成ファイルは「/etc/openvpn」フォルダには存在しないため、openvpnパッケージに付属している構成ファイルのテンプレートをコピーしてくる必要がある。
ca-admin$ sudo cp /usr/share/doc/openvpn/examples/sample-config-files/client.conf ../client/
OpenVPNクライアントの構成ファイルを編集する
以下の行を編集します。
42 remote xx.xx.xx.xx 1194 # ルーターWAN側IPアドレス
61 user nobody # コメントの「;」を消す
62 group nogroup # コメントの「;」を消す
88行目の、ca ca.crt(CA証明書)をコメントして、以下の内容を直接記述。
<ca>
# pki/ca.crtファイルの内容をそのままコピペ
</ca>
89行目の、cert client.crt(クライアント証明書)をコメントして、以下の内容を直接記述
<cert>
# pki/issued/client.certファイルの内容をそのままコピペ
</cert>
90行名のkey client.key(クライアント秘密キー)をコメントして、以下の内容を直接記述。
<key>
# pki/private/client.keyファイルの内容をそのままコピペ
</key>
以下を一番最後あたりに、追記
key-direction 1
更に、一番下に、TLS認証の共通キーを記入
<tls-auth>
# ta.keyの内容をコピペ
</tls-auth>
OpenVPNクライアントの構成ファイルの拡張子を変更する
最後にクライアントに配布するように、client.confの拡張子を変更します。
ca-admin$ sudo mv ../client/client.conf ../client/client.ovpn
自動起動の設定
systemctlをつかって設定をおこないます。
# OS起動時に起動する
ca-admin$ sudo systemctl -f enable openvpn-server@server.service

# 起動
ca-admin$ systemctl start openvpn-server@server.service
起動の設定ファイルの中身を確認したい場合は、「/etc/systemd/system/multi-user.target.wants/openvpn.server@server.service」を参照。
起動しているかの確認
port1194がUDPでオープンしていればOK。
ca-admin$ ss -antu | grep 1194
udp   UNCONN 0      0            0.0.0.0:1194       0.0.0.0:*
iptablesの設定
この図のとおり、vpnサーバーは「192.168.1.0/24」のネットワークと、「10.8.0.0/30」のネットワークに所属している。クライアントからLANに接続するには、vpnサーバーでIP転送の設定をする必要がある。
カーネルのip_forwardの設定
「/etc/sysctd.conf」を編集。以下の1行を追加。もしくは既に存在する場合は値を「1」に修正。
net.ipv4.ip_forward=1
設定を反映させる。
ca-admin$ sudo sysctl -p
iptablesの設定
natを設定する。10.8.0.0/24のネットワークから来たパケットで、eth0(192.168.1.0/24)に出ていくパケットをMASQUERADE。
ca-admin$ sudo iptables -t nat -A POSTROUTING -o eth0 -s 10.8.0.0/24 -j MASQUERADE
確認。
ca-admin$ sudo iptables -t nat -L -n -v
Chain PREROUTING (policy ACCEPT 60084 packets, 15M bytes)
 pkts bytes target     prot opt in     out     source               destination

Chain INPUT (policy ACCEPT 8300 packets, 1574K bytes)
 pkts bytes target     prot opt in     out     source               destination

Chain OUTPUT (policy ACCEPT 5 packets, 616 bytes)
 pkts bytes target     prot opt in     out     source               destination

Chain POSTROUTING (policy ACCEPT 19 packets, 2758 bytes)
 pkts bytes target     prot opt in     out     source               destination
  884  125K MASQUERADE  all  --  *      eth0    10.8.0.0/24          0.0.0.0/0
パケット転送を許可。
ca-admin$ sudo iptables -A FORWARD -i tun0 -o eth0 -j ACCEPT
ca-admin$ sudo iptables -A FORWARD -i eth0 -o tun0 -m state --state RELATED,ESTABLISHED -j ACCEPT
確認。
ca-admin$ iptables -L -n -v
Chain INPUT (policy ACCEPT 172K packets, 38M bytes)
 pkts bytes target     prot opt in     out     source               destination

Chain FORWARD (policy ACCEPT 112 packets, 22353 bytes)
 pkts bytes target     prot opt in     out     source               destination
28943 3272K ACCEPT     all  --  tun0   eth0    0.0.0.0/0            0.0.0.0/0
 111K  143M ACCEPT     all  --  eth0   tun0    0.0.0.0/0            0.0.0.0/0            state RELATED,ESTABLISHED

Chain OUTPUT (policy ACCEPT 142K packets, 152M bytes)
 pkts bytes target     prot opt in     out     source               destination
作成したiptablesのルールを保存する必要が有ります。iptables-persistentを使うとコマンドで指定したルールが、/etc/iptables/rules.v4に保存して、サーバー再起動時にも同じ設定を反映させることができます。
ca-admin$ apt install iptabels-persistent
インストール中に、「既にiptablesのルールがあります。保存しますか?」と聞いているので、yesを選択すると、保存される。
サーバー起動時に/etc/iptables/rules.v4の反映
保存したルールファイルをサーバー起動時に反映させる設定をします。aptでインストールするパケージは「iptables-persistent」だけど、systemctlから呼び出すのは「netfilter-persistent」なので、ややこしいです。
# 起動時に有効化
ca-admin$ systemctl enable netfilter-persistent.service

# 今スグ反映
ca-admin$ systemctl start netfilter-persistent.service
ルーターのポート転送の設定
openvpnのポート(1194)は、LANの中で開いているため、ルーターのWAN側にも同じポートを開放して、WAN側の1194へのUDPアクセスは、LAN内の「192.168.1.96」の「udp: 1194」に転送する設定をおこないます。
最後に
先程作成した、「client.ovpn」ファイルをクライアントに配布して、クライアントでopenvpnを使用して接続できれば完了です。

