9. IPアドレスとsshの設定
IPアドレスの設定
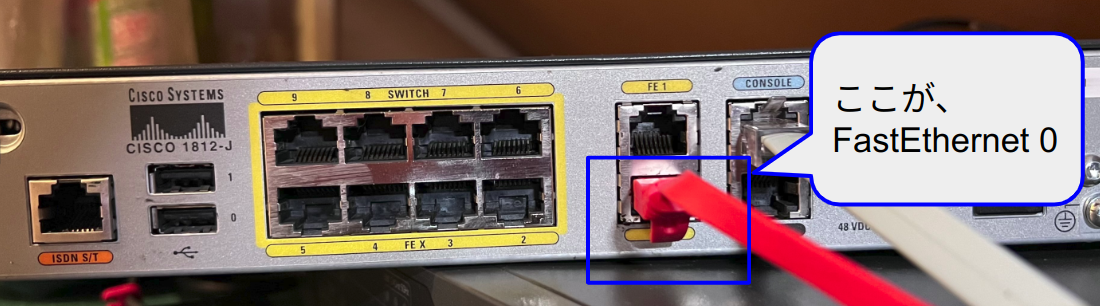
1812-Jの場合、FastEthernetのポートが2つある。それぞれラベルに、「FE0」と「FE1」と書かれている。FE0にRJ45を挿して既存のネットワークに接続した。
IPアドレスを振るポート名を知りたいので、コマンドで認識されているポートのステータス一覧を確認。今回設定したいのは、「FirstEhernet0」。この内容だと既に設定済みだが、本来は、unassignedになっている。
Router#show ip int brief
Interface                  IP-Address      OK? Method Status                Protocol
BRI0                       unassigned      YES NVRAM  administratively down down
BRI0:1                     unassigned      YES unset  administratively down down
BRI0:2                     unassigned      YES unset  administratively down down
FastEthernet0              192.168.1.80    YES NVRAM  up                    up
FastEthernet1              unassigned      YES NVRAM  administratively down down
FastEthernet2              unassigned      YES unset  up                    down
FastEthernet3              unassigned      YES unset  up                    down
FastEthernet4              unassigned      YES unset  up                    down
FastEthernet5              unassigned      YES unset  up                    down
FastEthernet6              unassigned      YES unset  up                    down
FastEthernet7              unassigned      YES unset  up                    down
FastEthernet8              unassigned      YES unset  up                    down
FastEthernet9              unassigned      YES unset  up                    down
Vlan1 unassigned YES NVRAM up down - 特権モードに移行。
- グローバルコンフィグレーションモードに移行。
- インターフェイスを指定してインターフェイスコンフィグレーションモードに移行。
- IPアドレスの設定
- インターフェイスの有効化
>en
Router#conf t

! 上記のリストを参照してインターフェイスを指定
(conf)#int FastEthernet 0

Router(conf-if)#ip address <IPアドレス> <サブネットマスク>
Router(conf-if)#no shutdown
SSHの設定
- OpenSSLでもProtocol Version1は既になくなっているので、Router側でも、sshのVersionは2を指定する。
- Router側でVersion2を指定しても、RouterのKeyアルゴリズムが古いため、sshクライアント側でアルゴリズムを明示してあげる必要がある。
以下、手順
- ホスト名の設定
- ドメイン名の設定
- RSA暗号キーを生成(1と2から生成するため、1と2は必須)
- ユーザーアカウントを作成
- ユーザーアカウントにローカル認証を設定
- SSHの接続許可を設定
- SSHのバージョンを設定
>en
Router#conf t
Router(config)#hostname r1
hoge(config)#ip domain-name local

! キーのサイズはデフォルトの512だとSSH V2に対応できないため、1024bitを指定
r1(config)#crypt key gen rsa
Choose the size of the key modulus in the range of 360 to 2048 for your General Purpose Keys. Choosing a key modulus greater than 512 may take a few minutes.

How many bits in the modulus [512]:1024

r1(config)#username user01 password pass

! 全てのvtyに一気にsshの設定
r1(config)#line vty 0 4

r1(config-line)#login local
r1(config-line)#transport input ssh

r1(config-line)#exit

! ssh v2を指定
r1(config)#ip ssh ver 2
クライアント側の設定(Ubuntu)
windowsの場合は、teratermを使えばいいので問題がない。Ubuntuの場合は、キーアルゴリズムとキャプチャーがRouter側の要求と違うというエラーがでる。
キャプチャーのエラー
$ ssh cisco
Unable to negotiate with 192.168.1.80 port 22: no matching cipher found. Their offer: aes128-cbc,3des-cbc,aes192-cbc,aes256-cbc
キーアルゴリズムのエラー
$ ssh cisco
Unable to negotiate with 192.168.1.80 port 22: no matching key exchange method found. Their offer: diffie-hellman-group-exchange-sha1,diffie-hellman-group14-sha1,diffie-hellman-group1-sha1
.ssh/confiに明示的に記入をしてあげる。
Host cisco
  HostName 192.168.1.80 #自分のルーターのIP
  Ciphers +aes128-cbc,aes256-cbc,3des-cbc
  KexAlgorithms +diffie-hellman-group14-sha1
ubuntuからsshにて接続する。
$ ssh cisco
Password:

hoge# !プロンプトが出てきて成功